
User Tools
This is an old revision of the document!
Table of Contents
This article is still being worked on. New info will be gradually added.
Stayin' Alive
Eve is a dangerous game and there are more ways to die in it than moons, planets and suns in any given region.
The following guidelines are meant to teach old and new players how to be more successful at stayin' alive in Eve and specifically Nullsec.
Despite the title, this guide will not help you stay alive indefinitely. It rather helps to increase the time between each death.
Local
The most important tool at your disposal is the Local Chat. While the chat can be ignored most of the time, the Member List is priceless.
Four reasons making it so damn awesome:
- Shows every single character as soon as he/she lands in system.
- Covers the whole system, not restricted by any distance.
- Can not be fooled by cloaking devices or any other ship specific bonuses.
- “Capsuleers in channel” allow you to quickly detect “local spikes”, many people entering a system at once (marked yellow in the image to the right).
Like almost everything in Eve there is one exception though, which is Wormhole Space. One of the reasons why Wormhole Space is considered dangerous, is because people will only show up in local when they used the chat. Considering how vital local is for survival, this is a major disadvantage.
Setup

Local is great, but to really make use of it, you have to set it up correctly first.
The first thing you want to do is set up your local window:
- Disconnect the local chat from any other chats you have. It should be open and in focus all the time.
- Tick “Show Compact Member List” under “Member List Settings” (marked red in the image to the right). This removes portraits from the Member List, allowing for more entries to show.
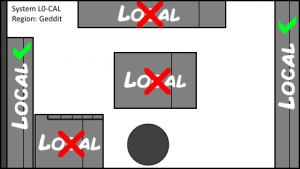
- Maximize the height of the chat window. Most players like to stretch it to a maximum on the left or right side of the screen. This allows you to see the full Member List most of the time, without having to scroll. Look at the image on the right side for good and bad positions of the Local Chat.

Secondly, you need to change your Overview Settings to show the correct icon colours. This is part of Unfucking your Overview]]. If set up correctly it shows friendlies with blue and green, neutrals in grey and enemies in red or orange. This allows you to quickly gain knowledge how dangerous a system is by checking your Local Chat.
Tips
- Keep track of new characters to a system you are in by selecting a person in the Member List and clicking Ctrl+A. This will select all users in Local, making new ones easy to spot, since they are not selected.
- Look up the corporation and the killboard of neutrals on external websites. It allows you to guess what ship they are likely to fly and what they plan to do in your system.
- Multiple characters of the same corporation or alliance are most likely in a fleet and work together. While a single neut can be your death, fleets are much more dangerous. Be wary of that.
- Do not spend too much attention on the Chat. People may try to distract you by inviting you to a Personal Chat or asking you questions in local.
DScan
Probably the second most important tool is the Directional Scan you have. It allows you to scan for objects in a 360° angle and a maximum range of 14.3 AU, which translates to 2,139,249,551km (so a whole f*cking lot). It is advised to keep it open all the time, so you don't have to take the extra step of opening it when you need it.
You may want to use an Overview Preset (marked green in the image to the right) to filter for certain types (marked blue) of objects.
How and when to use it
 In everyday space travel you want to have it set to maximum range and maximum angle. You have to click the scan button every few seconds to update your scan.
You want to do this when you there are neuts/enemies in system or in any situation where you might be in danger. It is also very useful when you want to report Intel to your FC or the Intel Channel. Read “Scouting” in Useful Websites for info on how to do properly post DScan reports.
If a new neutral jumps into your system update your DScan and look for new ship entries. You may be able to find out what ship they are in through this method.
Sometimes players forget to rename their ship as well. They will show up as <Player Name>'s <Ship Name> (marked orange on the image to the right) which makes identification even easier. Be aware that players may use this and rename their ship to confuse you though. If “RandomDude's Avatar” just showed up on DScan it's probably not a Titan that just entered the dead-end system you are in.
The most important thing to look for are Combat Scanner Probes. These are used to pinpoint the location of a player to get a warp in.
Assume that every Combat Scanner Probe is looking specifically for you!
Using range
Usually you will keep the range at maximum. You want to decrease it to estimate your distance to objects.
Let's say an enemy is 6.8 AU away from you, he will show up on your DScan at range 14.3 AU and 10.0 AU, but will disappear from it at 5.0 AU. With this in mind you can successfully determine that the enemy is between 5.0 and 10.0 AU away by decreasing your range between scans.
This is also a good method in combination with the Solar System Map to find the position of one or multiple enemies.
Using angle
Decreasing the angle is usually done to single out specific areas of space. The minimum angle will only scan for objects directly in the middle of your screen (not in front of your ship), so whenever you want to use it, be sure to use the centered tracking camera, which can be done so on the left of the Ship Control Panel. You can use the Map Browser (F11) to see where you're pointing your scan, from a 2D top-down view.
Say your are in a system and want to jump a gate that is within your maximum range. There are hostiles in system and they show up on your DScan as well. To determine if they are sitting on the gate, ready to intercept you, you want to center the camera on the gate and decrease your angle. If they are still on your DScan when your angle is fairly low they are probably at the gate, meaning it is not safe to jump through.
Intel
Intelligence, or Intel for short, is a great tool, but depends very much on others to work well. Since you are one of “the others” for another pilot you should try to contribute to the channel as well.
It is important to know that the Intel Chat is one of the few taken very serious in Eve. If you post anything beside valid Intel or status requests you will attract the anger of others and you could even get banned from the channel (very bad).
Some people like to have the Intel Chat in separate window, but it's also sufficient if you have it among your chat windows, if you keep it in focus when you are travelling.
How to use it
Intel will tell you what system enemies are spotted in. Additionally their names, the ships they fly in and their position in a system may be noted.
If you are in a system you want to remember systems connected to yours or other important ones close by. That way you can watch Intel for any reports from these specific systems only.
It is also valid to ask for Intel from a specific system by posting “<System/s name> status?”. You may not always get an answer, but if you are lucky there is a helpful capsuleer in the system you are looking for who will answer your request.
How to contribute
Intel has specific rules for reporting. These are also noted in the channel, but here they are as well for your convenience.
Required
System Name
Number of neutrals/enemies
Ship types or DScan link / “nv” for no visual
Alliance or a link to the name of one of the enemies
Optional
Enemy's position in system
Enemy's activity in system
Here are some examples of good Intel:
- 5H-SM2 Mew +3 2 ONi, VNI, Tengu - System, enemy + 3 and ships noted. Perfect.
- 1L-OEK SuperDude +15 <DScan link> gate camping q-g - System, enemy + 15 and a DScan to show their ships and their position as well as what they are doing.
- U-HVIX about 30 Neuts nv - System, enemy number, no visual. Small Intel, but if this is the only information you it's ok to post it and will help others.
- F-QQ status? - The correct way to ask for a system's current status.
…and some bad Intel:
- help! I'm being attacked! - Posted in the wrong channel. Try Alliance or Corp chat, but even there you would have to give more information.
- big fleet just jumped into my system - What system? What corp/alliance are they from? How many is “big”? What are they flying in?
- Any enemies around? - Ask for a specific system.
- <any conversation starters/other than status questions/fleet advertisement/not Intel related stuff> - To be effective Intel Chat depends on people not spamming the channel with trivial messages. Just don't.
Travel
Autopilot
While you may be tempted to use Autopilot for those long trips, it is highly discouraged in null-sec. You will die 99.9% of the time because you cannot escape a gate camp by being AFK (not to mention the 20km warp issue).
Dangers
Camps
We all know these strategic roadblocks. In null-sec, gate camps can consist of several players, anchored bubbles, and bubbles from both regular and heavy interdictors (make sure to learn the difference in mechanics between the two ships and their bubbles). There are different ways to deal with camps depending on the ships types of both the campers and yourself, and if there are bubbles or not.
Bubbles
“Bubbles” are the colloquial term for the fields created by Mobile Warp Distruptors (“anchorable bubbles”), Interdiction Probes (“dictor bubbles”), or Heavy Interdictor ship-based fields (“hictor bubbles”). They will impede the warping or jump-drive activation of any ship in their radius, and are a frequent tool for large-scale tackling in fleet fights as well as traps laid at nullsec gate camps. For a more detailed discussion of the somewhat-complex mechanics of bubbles, please see this page.
Scramblers
Unlike warp disrupters, warp scramblers will disable MWDs, MJDs, & MJFGs at the expense of activation range. They make burning back to gate in an MWD ship significantly slower.
Webifier
Significantly reduces the velocity of the targeted ship. Makes burning back to gate difficult. Actually will decrease time for target to warp if not disrupted/scrammed.
Support
Cloaking Devices
Covert ops cloaking device allows appropriate ships to warp while cloaked. Non-covops cloaking devices can still be used for the MWD+cloak trick to escape gatecamps http://wiki.eveuniversity.org/Cloak_Trick. Useful for warping to a safe and cloaking up until the coast is clear.
Afterburners
Slower velocity than MWDs, but easier fitting requirements and not shut down by warp scrams. There are also some ships that can fit an oversized AB. The Afterburner skill and it's related support skill, Fuel Conservation, significantly increase speed and reduce capacitor use.
MicroWarpdrives
Gives your ship a significant speed boost, but can use a lot of capacitor. Also can be shut down by warp scramblers and scripted warp disruption field generators. Note: On smaller ships, MWDs will increase your time to warp. Related skills: Acceleration Control, High Speed Maneuvering.
Warp Core Stabilizers
They give your ship a bonus of resistance to warp scramblers and disruptions. They will help you warp off if your attacker doesn't have powerful scramblers and disruptions. They will not help you with bubbles. The trade off is that your ship will take longer to lock its targets.
Tactical bookmarks
Essential for traveling around null-sec, tactical BMs can be the difference between arriving safely at your destination or dying in a fire. You can make them yourself (time-consuming), or you can check out the pre-made packs that several people have for sale on our forums.
How to make a safe spot and bookmarks
A safe spot is a point in space that is not on any grid that be accessed through the regular overview. You can make as many personal safe spots on a system as you want or need. They are useful to hide from your enemy or as a safe location to re-fit your ship or scan anomalies and signatures.
Many people have safe spots within 14AU form the gates, so you can use your directional scanner to keep an eye on who is coming and going on the system.
They are very easy to make following this steps.
- Once you enter the system press ctrl+B. This will open the “add bookmark” dialog.
- Warp to the sun with the “add bookmark” dialog open.
- Mid warp (you can see the distance from your destination on screen) hit save, you can press enter or the submit button. It is important to note that the location will saved were you hit the submit location button and not where you open the dialog box.
- Congratulations! you have just made a safe spot.
You can access your safe spot through the “people and places” menu. In that menu you will find three categories, contacts, agents and places. In the “places” categories, it should be listed as “spot in the your system solar system”. You will want to rename that to something meaningful because during your eve career you will make hundreds of this spots around several systems. Naming this spot, Safe 1 will work fine. To do that you can right click on that location and hit “edit/view location”. This will open the dialog once again, you can rename the location, add notes and put it in a sub-folder to keep them organized.
Some recommendations:
- Keep your bookmark organized. Create sub-folder by region or constellation, everyone has its way, but you want to be able to find your bookmarks fast.
- Rename your bookmarks to something meaningful. “Safe 1”, “Safe 2”, will work, But better yet, “Safe 1. 10 AU from TVN-FM gate” this will let you navigate and keep eyes on your exits while being safe.
- Create a bookmark 150km (the minimum warp distance) from gates. You can warp at 100 form a gate a burn to 150km and make a safe. This way you can warp to this spot, take a look at the gate, see if its camped, bubbled, and make an informed decision.
- Have your “People and places” menu open at all time. with you bookmarks visible (hit the small “eye” in there) and ordered by ump distance. This way, your bookmarks in system will be listed on top of everything and highlighted in green. Useful, eh?
Once you learn to navigate thruogh bookmarks and safes, your survival rate will increase notably, specially if you are mining or exploring.
Perches
Perches are BMs that are over 150km from your destination that allow you to scout it out before committing. These allow you to warp 150km+ above a gate or station to see if it's camped, then warp down to it to continue on your journey. Perches can also be used to avoid gate bubbles so that you don't have to slowboat to a gate.
Corp bookmarks
Depending on the size/proactiveness of your Corporation, you may see tactical bookmarks already in existence for commonly traveled systems & stations. Simply right-click in space to see any available BMs. You can add corp BMs, but can only edit them if you have the “Communications Officer” role for your corp. Alliance BMs do not exist at this time.
Grid
With the January 2016 patch, grid size was massively increased, from 250km to 8,000km. This has caused many off-grid, insta-undock, and safe spot BMs to now be on grid.
Stations
Undocking
Station docking radii vary greatly. Some stations you can undock and still remain in docking range for several km, yet on others you will be out of docking range almost immediately upon undock. This can be a problem when undocking around hostiles, as you can be bumped, webbed, or blapped before you are able to get back within docking range. Creating instant-undock BMs (or using corp BMs) can ensure you can escape a non-bubbled station camp. Insta-undocks must be over 150km away from and within a straight line of the undock. Your ship will instantly warp before the enemy can target you, and then you can safely warp off. Insta-undocks can also be used for scouting on the way to the station. Warning: for popular stations, enemies WILL have the location of the corp BMs, so warp to them at range or use your own when there are hostiles in system.
Docking
The docking radius for a station varies depending on its physical model. It is possible to exit warp yet still be several km from docking, which can result in you getting blapped by enemies camping the station. In order to prevent this, create a BM (or use your corp BM) that is at 0km and well within the docking radius (but not inside the physical model, which could cause a bad bump). Now you can warp to the station at 0km every time, and safely spam dock.